Geotag and import photos
Photo2shape analyzes a collection of geotagged images or photos and creates a vector layer, containing their location and some additional information extracted from the EXIF tags.
Usage
Once installed and enabled, the plugin adds an entry to the “Vector” menu and adds three buttons to the “Vector” toolbar. If you don’t see its icons, please make sure that the “Vector” toolbar is enabled.

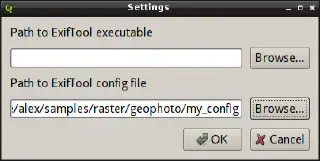
The plugin uses ExifTool to work with tags. The application should be available in PATH. If it is not there, specify the path to the exiftool executable in the plugin settings

In the settings, you can also specify the location of the ExifTool configuration file, which is often needed to write custom tags.
Geotagging photos
Often, photos do not have location data in the EXIF tags, but the coordinates of the place where the photo was taken are known. For example, in wildlife monitoring and research, so-called “photo traps” are used: hidden cameras connected to a motion sensor that are triggered when something appears in the camera’s field of view. As there can be many cameras, it is not practical to equip them with GPS receivers, for both technical and financial reasons.
The “Geotag photos” tool is used to add location information to such photos.

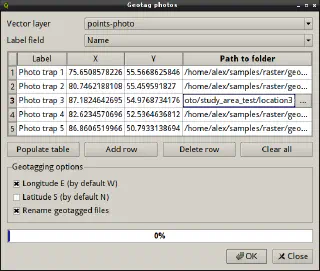
In the “Vector layer” combo box, select a layer containing the coordinates of the survey points. The “Label field” combo box has an auxiliary function; point labels are taken from the field selected in it. This can be useful if the input layer contains many points.
Clicking the “Populate table” button will fill the table - for each point, the plugin will add a separate table row and display the label and coordinates of the point in the corresponding columns. You can delete unnecessary rows using the “Delete row” button or clear the whole table using the “Clear all” button. It is also possible to add empty rows (using the “Add row” button) and fill them manually.
The “Path to folder” column should contain the path to the directory containing photos taken in a specific location. The path can be entered manually or selected using the standard directory selection dialogue.
If the “Rename geotagged files” checkbox is checked, the files will be renamed during processing using the pattern location\_camera\_datetime_number.
Creating and editing tags
To change an existing tag or add your own tags, use the ‘Tag Photos’ tools. For example, you can add a custom tag to photos with the name of the species in the picture.

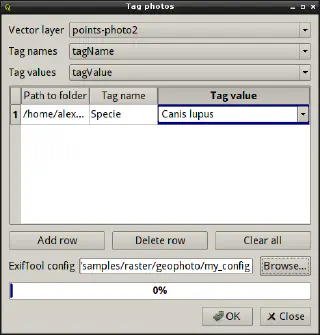
The dialogue is similar to the previous one. Again, you need to select a vector layer or a regular table (the “Vector layer” combobox) containing fields with tag names and their values (the “Tag names” and “Tag values” combo boxes).
Adding data for processing is done manually using the “Add row”, “Delete row”, “Clear all” buttons. Each row of the table must contain the path to the folder containing the photos (“Path to folder”), the tag name (“Tag name”) and its value (“Tag value”). The path can be entered manually or specified using the standard directory selection dialogue. The tag name and value can either be entered manually or selected from the list, in the latter case the lists are filled with the values from the attribute table fields specified above.
Since ExifTool needs a special configuration file to create custom ExifTool tags, the dialogue provides a way to specify it. In this case, the file specified here will have priority over the file specified in the plugin settings, as well as over any other configuration file (e.g., from the user’s home directory).
Creating shapefile from photos
If your photos contain location data in tags, you can create a point shape file from them. This is done using the “Import photos” tool.

Compared to photo2shape, this tool has a number of additional features.
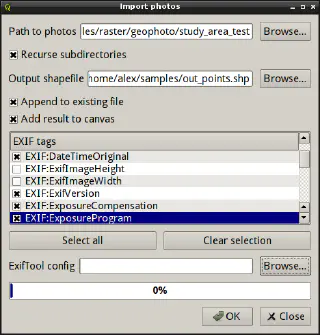
In the “Path to photos” field, the path to the directory containing the photos should be entered, the “Recurse subdirectories” checkbox activates the recursive directory traversal mode. The “Output shapefile” field specifies the name of the output shapefile. If the “Append to existing file” checkbox is checked, the data will be appended to the end of the existing file. From the “EXIF tags” list, you can select the tags to be written to the output shapefile. Note that if an append mode is enabled and there is no corresponding column in the existing file — the tag value won’t be written to the output file.
The ability to specify an ExifTool configuration file is useful if photos contain custom tags, and you want to display their names.