Recently, there have been a lot of questions about working with CSV files in QGIS. So here is my attempt to shed some light on this complex and confusing topic. Be prepared for a longread.
We all face problems from time to time. Here are a few recent ones from my personal collection.
QGIS and SpatiaLite
Those who build QGIS themselves know that not so long ago there was a move to use external spatialindex and SpatiaLite instead of internal bundled copies. The former has been completely removed, but SpatiaLite is still there because it is either missing or too old in some distributions (namely Debian Squeeze, as well as Ubuntu Lucid, Maverick, Natty and Oneiric). The problem occurs when building QGIS with an external version of the library.
For historical reasons, the SpatiaLite can be compiled in two different ways:
as a loadable extension module for the system version of SQLite
as a standalone all-in-one library that combines the SQLite engine with the spatial capabilities of SpatiaLite
So. If you have SpatiaLite built as an all-in-one library, you can kiss SpatiaLite support in QGIS goodbye. You will not be able to create a new layer or open an existing one. What spices things up is that both configuration and compilation go smoothly: no missing files, no errors. The solution is to rebuild SpatiaLite as a loadable module and then rebuild QGIS. However, at this point you may face another problem.
SpatiaLite and dynamic linker
If the configure script constantly fails to find SQLite, GEOS and PROJ.4 when building a loadable SpatiaLite module on Linux, even though all these libraries are installed and have the correct version number, it is likely that your distribution has a policy of using unmodified source code (i.e., sources are only patched when absolutely necessary).
It should help to run configure as shown below
LDFLAGS=-ldl ./configure
PyQt4 and a new style of signal-slot connections
Since PyQt 4.5 there is a “new” style of signal-slot connection available in addition to the old style (more details). The new style is more Pythonic, and it is highly recommended to use it instead of the old style. The only thing is… if the interface was generated in Qt Designer and then converted to code using pyuic4, and the new style signal-slot connections are used in the code, then when you try to disconnect the signal from the slot, you may get a message that the operation cannot be performed. The situation has been clarified after contacting the developers:
PyQt allows connections to be made to any Python callable.
With old style connections a proxy slot is created under the covers whenever a callable is used (as opposed to when SLOT() is used to refer to a C++ slot). Therefore, in your example, a proxy is always created for the connection to Dialog.reject even though that refers to the object that wraps the C++ slot (as there is no Python reimplementation of reject()).
New style connections are a bit smarter in that they treat slot objects that refer to a wrapped C++ slot and objects that refer to some real Python code differently – a proxy is only created in the latter case.
So the rule is that if you make a connection old style then you must disconnect old style as well and the same for new style. You also need to be aware that pyuic4 uses old style connections.
It’s actually a bug, but they won’t fix it.
I accept that this is a bug, but I don’t want to fix it. The reason is that the changes required to the old style support code would be quite significant and I don’t think the risk to the stability of that code is worth it at this stage of the life of PyQt4 particularly as the workaround is straightforward.
The mentioned workaround is to create a dummy slot that simply calls the corresponding slot of the parent object. I.e., if you wanted to disconnect the reject() slot of a dialogue from the rejected() signal, using the old style, it was enough to write
Statist. My first plugin for QGIS. That was a long time ago: 2009, QGIS 1.0.0, start of discussions about including fTools in the core (yes, fTools was a regular plugin that had to be installed manually), only a few third-party plugins, and almost no instructions on how to write Python plugins… And I was younger and didn’t know much (to be fair, I still have a lot to learn).
The last major update of the plugin was also in 2009: I was happy with the functionality, and there were no critical bugs. Later, as I gained knowledge and experience, I thought about refactoring several times, but it didn’t work out. And recently, something came over me, so I sat down and did it.
Users will probably not notice any difference, as there are not that many changes visible to them: only support for getting statistics on joined fields has been added. But there are many more changes under the hood:
the code to check for the presence of matplotlib has been rewritten
new signal-slot connection syntax is used
completely rewritten code for calculating statistics
unused and duplicate code was removed and classes were moved into separate files
system font is used for histogram labels
The plugin now lives in my repository, please report bugs and feature requests by mail or in the bugtracker (preferred).
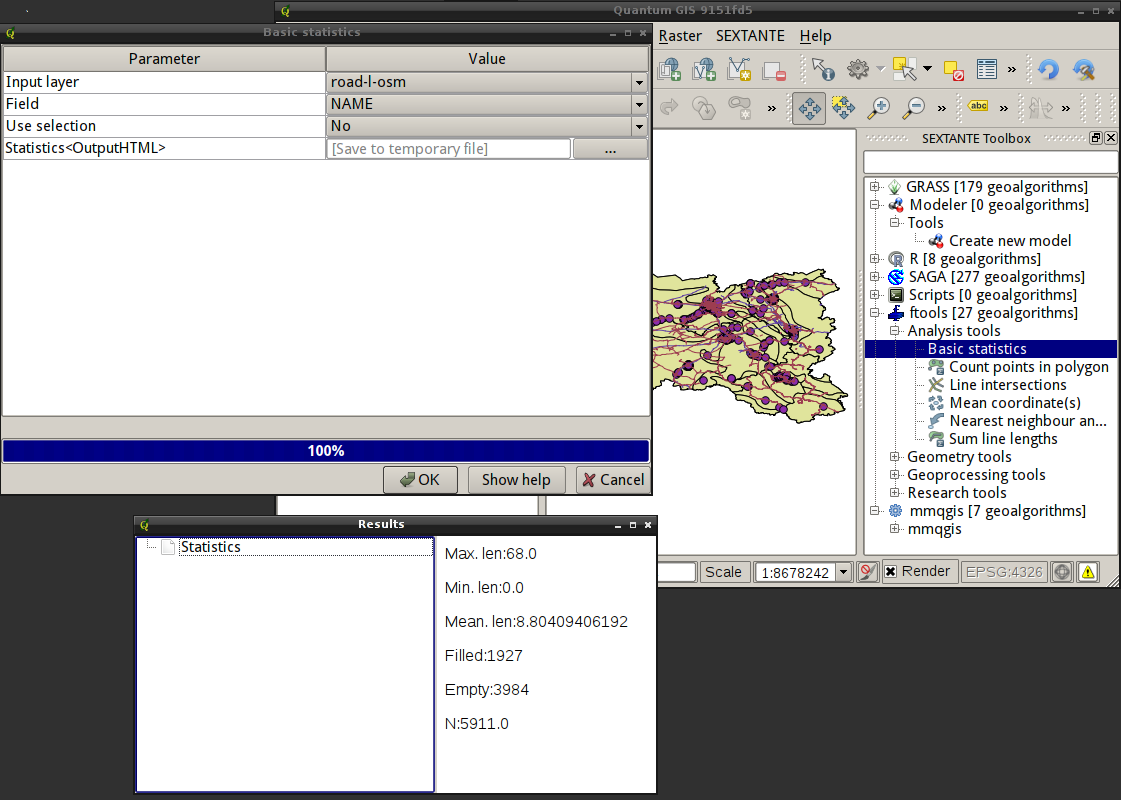
Victor Olaya has developed another framework for integrating various libraries and tools into QGIS. It is based on the SEXTANTE platform, which includes a toolbox, a graphical modeler and a script creator. It also provides a batch processing interface, command history, and some other features. The platform currently supports SAGA, GRASS, and R algorithms, as well as tools from the fTools and mmqgis plugins. According to the author, it is quite easy to add new algorithms and new providers.
I haven’t had a chance to test it properly yet, but it looks interesting and promising. The screenshot shows the list of tools, the GUI of the Basic Statistics tool from fTools and the result it produced.
SEXTANTE plugin in QGIS
Please note that this is still a work in progress, so regular users are better off waiting for the official release rather than using code from SVN.
In the post “Getting started with openModeller” I showed how to use openModeller Desktop to identify areas at risk from invasive species. Another task that can be done with openModeller is modelling the distribution of species under new climate conditions.
Not long ago, people on the forum were looking for a way to consolidate the QGIS project and related layers into one place. As no such tool existed, the discussion quickly turned into a thread full of wishes and feature requests. A little later, I was faced with the same task. Fortunately, in my case, the project only had vector layers in Shapefile format, so I quickly developed a simple and somewhat suboptimal plugin.
Now that I have more free time, I am slowly improving the plugin. I have already implemented:
support of file-based vector datasources
support for native database providers (PostgreSQL, SpatiaLite, SQLAnywhere)
layer processing has been moved to a separate thread, and the tool no longer blocks the main QGIS window
initial support for GDAL rasters
On the TODO list:
support for all vector data providers
finalise support for raster layers
provide the user with a choice of vector data format (Shapefiles or SpatiaLite database)
In the post about openModeller command-line tools, I have mentioned request files several times. When using openModeller from the command line, we have to deal with these files very often, as they allow us to perform almost all necessary actions and go from the input data to the results.
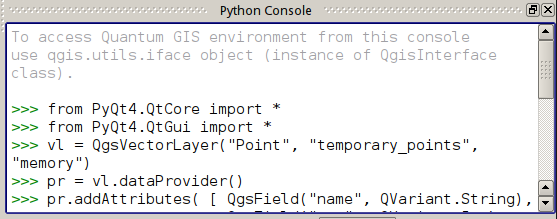
Most QGIS users are probably aware of the Python Console, even if they rarely use it. It is a window (accessible from the “Plugins → Python Console” menu) where you can interactively enter commands and access QGIS API functions.
QGIS Python Console
The Console is an extremely useful tool and comes to the rescue in many scenarios, from prototyping plugins to automating repetitive actions.
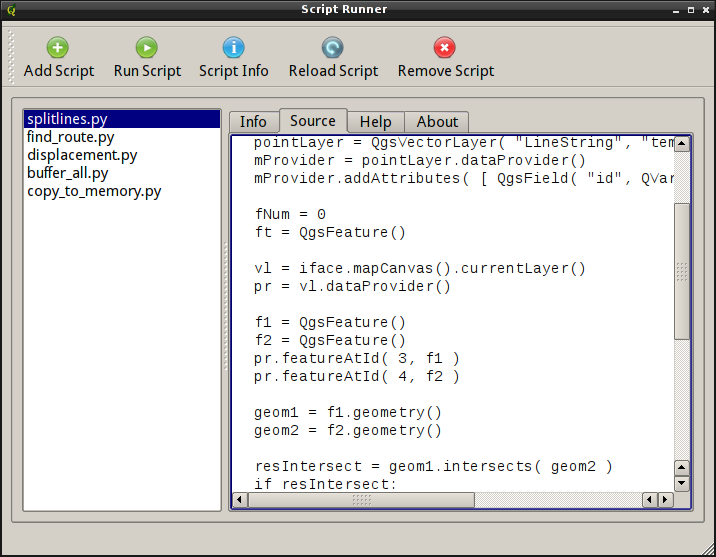
Obviously, typing commands every time you need to perform some task is inconvenient, so frequently executed code is transformed into scripts, and these scripts are then run from the Console. However, if the number of actively used scripts is large enough, using the console becomes a bit inconvenient. The Script Runner plugin by Gary Sherman was developed to solve this problem. The plugin is available from the official repository, has no dependencies, and can be found in the “Plugins” menu after installation.
The plugin’s interface is simple: a toolbar with large buttons, a list of scripts on the left, and four tabs — “Info”, “Source”, “Help” and “About” — on the right.
Script Runner plugin
The “Add Script” and “Run script” buttons are self-explanatory: the first one adds a script to the list (the list is saved between sessions), the second one runs the selected script.
Clicking the “Script Info” button will populate the “Info” tab with docstrings, function and class names from the selected script, and the script code will be loaded into the “Source” tab in read-only mode.
I think the purpose of the last two buttons, “Reload Script” and “Remove Script” is clear from their names. The first reloads the script (useful for debugging or if you need to tweak the code and run the process again), and the second removes the script from the list (leaving the file on disk).
Script Runner has only one requirement for scripts: they must have an entry point. The entry point is simply a run_script function that takes only one argument, a reference to the qgis.utils.iface object. If such a function is not present in the code, the script will simply not be recognised and loaded by the plugin.
The script logic can be implemented either within the run_script function or in separate functions called from it. It is also possible to use an OOP approach. In this case, you need to create an instance of the class in run_script and call the necessary method(s).
Here is a simple example (the script creates an empty LineString memory layer):
Last year I wrote “Getting started with openModeller” post which gave an overview of openModeller - a free open-source ecological niche modelling tool - and showed how to run experiments in the openModeller desktop GUI. However, it is often faster and easier to perform the necessary actions using command-line tools. This is the subject of this post.