Using OziExplorer rasters in QGIS
23.10.2011 12:57 · GIS · qgis, gdal, howto
Quite often, I have come across the question: How can I use the georeferenced rasters (raster + map file) from OziExplorer in QGIS? In order to use such data in a GIS, it is usually necessary to convert them first, e.g., with GlobalMapper. With the release of GDAL 1.7.1, there is no need for proprietary software, as GDAL now supports OZI map files.
Let’s see how to do this in QGIS.
Preparation
To work with georeferenced images from OziExplorer we will need:
- QGIS 1.5 or a later version
- GDAL 1.7.1 or higher (normally installed with QGIS)
- GdalTools plugin (not required if you are comfortable with the command line)
In this post, I will assume that everything is installed in the default directory C:\OSGeo4W.
Preparing data
Georeferenced rasters from OziExplorer are usually distributed in GIF format and have a specific MAP georeference file. If the raster is not in GIF format, you must first convert it to GIF, for example, using ImageMagick or another graphics package. Otherwise, it will be impossible to convert the files to a common GIS format (e.g., GeoTIFF). This limitation will probably be removed in the future, but at the time of writing, only GIF files were supported (see GDAL’s ChangeLog and commits 17684 and 17784).
In the MAP file, the third line specifies the raster file name
OziExplorer Map Data File Version 2.2
200k--p41-23_24
200k--p41-23_24.jpeg
Since we are going to work with the raster in GIF format, it is necessary to modify the MAP file accordingly by correcting the extension to `.gif':
OziExplorer Map Data File Version 2.2
200k--p41-23_24
200k--p41-23_24.gif
Of course, the raster also needs to be saved in GIF format.
The preparation is over; now we can proceed with the conversion. This can be done either in QGIS or from the command line.
Conversion using QGIS and GdalTools
Start QGIS. If the GdalTools plugin is not enabled (there are only a few items in the “Raster” menu), enable it: “Plugins → Manage Plugins…”, find GdalTools in the list and enable it. If this plugin is not in the list, download and install it: “Plugins → Fetch Python Plugins…”.
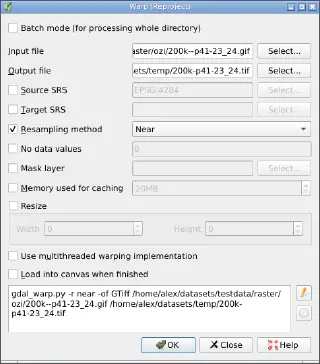
Open the “Warp” tool (“Raster → Projections → Warp (Reproject)”). Specify a GIF raster as the source file, uncheck the “Source SRS” checkbox and select linear interpolation. If necessary, activate the “Load into canvas when finished” checkbox.

Press the “OK” button and wait for the process to finish. The output raster will have the same georeferencing as the input.
Conversion in the commandline
The same result can be achieved from the command line. To do this (assuming that the conversion to GIF has already been done and the MAP file has been corrected):
- open OSGeo4W Shell (Windows) or terminal emulator (Linux)
- go to the directory where the raster is located
- execute the following command
gdalwarp -r near file.gif file.tif