How to extract raster's georeferencing
27.07.2011 15:41 · GIS · python, gdal, howto
It is no secret that one of the most common raster formats, TIFF, is able to store georeferencing information within the file, turning it into a GeoTIFF. Everything would be fine if it weren’t for one nuance: the vast majority of graphic editors suffer from “star fever”, believing that unrecognised tags have no place in the file and happily removing this valuable information when saving the file.
This feature of graphic editors is often used to “reset” georeferencing (for example, if the image is incorrectly georeferenced and needs to be georeferenced from scratch). A natural question arises: what to do if you need to edit the image in a graphics editor but do not want to lose the georeferencing? The answer is not original, it is necessary to save it in an external file (the so-called world file).
Let’s consider three possible solutions.
Method one — masochistic
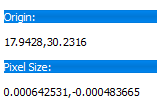
It implies creating a world file manually. The world file is an ordinary text file, so there is nothing complicated here (familiarise yourself with the format). It is possible to get the necessary data about pixel size and corner coordinates with most GIS. For example, with QGIS it is enough to load the raster, open its properties and find the necessary information on the “Metadata” tab (see the “Pixel Size” and “Origin” sections).

The disadvantages of this method are obvious: it is slow, error-prone and cannot be automated to process many images at once. There is another disadvantage - for complete georeferencing it is desirable to have a .prj file (the file describing the coordinate reference system) in addition to the world file. This means that it is also necessary to find the CRS definition and write it correctly into the .prj file.
Method two — using the console
GDAL comes to the rescue with its gdal_translate tool. Using the file creation options, we can force it to generate the world file for us.
gdal_translate -co "TFW=YES" input.tif output.tif
Pros: can be automated. Cons: the .prj file is not created, also this method creates a copy of the original raster. This is not suitable if you have a lot of rasters, and they are huge, because it will take a lot of time and you will need a lot of disk space.
Method three — writing code
The sweet couple, GDAL + Python, come to the rescue. The code below
def extractProjection(filename):
    raster = gdal.Open(filename)

    crs = raster.GetProjection()
    geotransform = raster.GetGeoTransform()

    raster = None

    outFileName = os.path.splitext(filename)[0]

    # create .prj file if CRS is valid
    if crs != '':
        tmp = osr.SpatialReference()
        tmp.ImportFromWkt(crs)
        tmp.MorphToESRI()
        crs = tmp.ExportToWkt()
        tmp = None

        prj = open(outFileName + '.prj', 'wt')
        prj.write(crs)
        prj.close()

    # create world file
    wld = open(outFileName + '.wld', 'wt')
    wld.write('%0.8fn' % geotransform[1])
    wld.write('%0.8fn' % geotransform[4])
    wld.write('%0.8fn' % geotransform[2])
    wld.write('%0.8fn' % geotransform[5])
    wld.write('%0.8fn' % (geotransform[0] + 0.5 * geotransform[1] + 0.5 * geotransform[2]))
    wld.write('%0.8fn' % (geotransform[3] + 0.5 * geotransform[4] + 0.5 * geotransform[5]))
    wld.close()
Call the function within the recursive directory traversal code, and you have a handy tool. Just don’t forget to import the necessary modules:
from osgeo import gdal
from osgeo import osr
Advantages of the method: full and customisable automation, maximum information is extracted (projection data and actual georeferencing information). Disadvantages: requires at least basic programming skills.