Adding a layer list widget to a PyQGIS application
14.02.2011 09:31 · GIS · qgis, python, howto
QGIS is not only a ready-to-use desktop GIS, but also a set of libraries that can be used to create custom GIS applications. Unfortunately, when creating such applications, developers have to implement some GUI elements from scratch. An example of such a widget is the list of loaded layers (sometimes incorrectly called a legend).
In this post I will show the process of embedding a layer list widget into a PyQGIS application. The widget was developed by Germán Carrillo and you can get the code and read how to use it in Germán’s post “Layer list widget for PyQGIS applications” on the GeoTux blog.
The code was tested with QGIS 1.7.0 from trunk. Newer versions of QGIS may contain changes that break the code.
Preparation
I will assume that all software is installed using the OSGeo4W installer in the default path C:\OSGeo4W. Besides QGIS itself with all its dependencies, we will need the following packages from the “Libs” category pyqt4, qt4-devel, qt4-doc, qt4-libs. These packages contain the developer tools, necessary libraries and documentation.
I also assume that you are already familiar with the process of creating PyQGIS applications and the QGIS Python API. If you are not, I recommend that you read the “Creating PyQGIS applications” section of the QGIS Coding and Compilation Guide. To demonstrate how to embed and use the layer list widget, I have slightly modified the example from that guide.
The full code of the final application can be downloaded here.
Widget overview
The layer list widget was developed by Germán Carrillo, and it is a simplified version of the QGIS layer list. The main difference from the original widget is that it lacks new symbology support and layer groups.
This is how the widget looks in an application
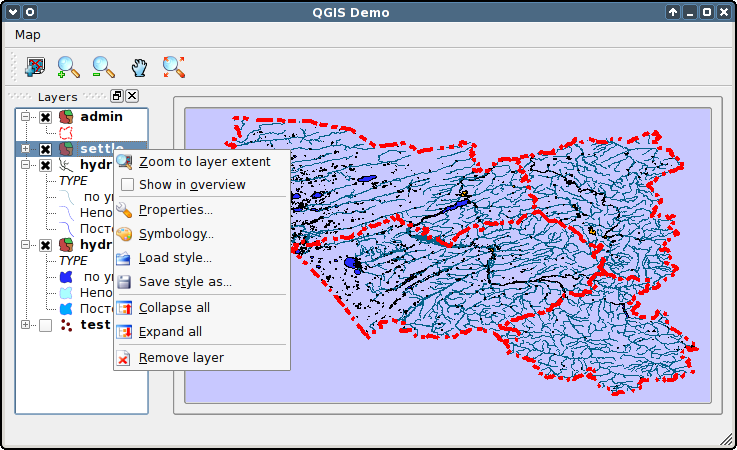
The widget allows:
- display an ordered list of map layers
- change the order of layers in the widget with a corresponding change in the order of layers on the canvas
- change layer visibility
- display/change layer symbology (it is recommended to create your own symbology settings dialogue, the widget provides a very basic layer properties dialogue)
- change some properties of the layer (layer name, display field and some others)
- save and load layer styles
- remove layers
The widget code is distributed under the terms of the GNU GPL v2.
Using the widget in an application
First you need to download the widget source archive and extract its contents to the directory with the application. The archive contains:
- the
legend.pyfile with the widget code - a few icons used by the widget to indicate the type of layer geometry
- icons for context menu actions
- a simple layer properties dialogue box
Initialisation
In the main class of our application, we need to import the Legend class from the legend.py file
from legend import Legend
In the same class we also need to create a new method CreateLegendWidget (the name of the method can be different) which will be responsible for creating the dock widget with the legend
def createLegendWidget(self):
    # create our layer list widget
    self.legend = Legend(self)
    self.legend.setCanvas(self.canvas)
    self.legend.setObjectName("theMapLegend")

    # create dock widget for the layer list
    self.LegendDock = QDockWidget("Layers", self)
    self.LegendDock.setObjectName("legend")
    self.LegendDock.setAllowedAreas(Qt.LeftDockWidgetArea | Qt.RightDockWidgetArea)
    self.LegendDock.setWidget(self.legend)
    self.LegendDock.setContentsMargins(9, 9, 9, 9)
    self.addDockWidget(Qt.LeftDockWidgetArea, self.LegendDock)
This new method should be called in the __init__() method of the main application class. Note that the legend creation must be done after the map widget (QgsMapCanvas) is created
class MainWindow(QMainWindow, Ui_MainWindow):
    def __init__(self):
        MainWindow.__init__(self)

        # initialise application GUI
        self.setupUi(self)
        # create map canvas
        self.canvas = QgsMapCanvas()
        …
        # create layer list (legend)
        self.createLegendWidget()
Usage
The legend widget uses several icons: icons for different layer types and icons for a layer’s context menu. To display them, we need to compile the resources.qrc file included in the archive with the following command
pyrcc4 resources.qrc -o resources_rc.py
The legend.py file already contains a reference to the file generated in this way. If the application uses its own resource file (and this is the case most of the time), there are two options:
- rename one of the resource files
- put all resources in a single file
In the latter case, you may need to specify separate prefixes for resources belonging to different parts of the application (e.g. one prefix for the legend icons and another for the rest of the resources). If the prefix for the legend resources is changed, the resource_prefix variable in the legend.py file must be changed accordingly
resources_prefix = ":/legend/imgs/"
I chose the second option: all images are in the images directory and its subdirectories. In the resource files I have created two prefixes and changed the resource_prefix variable in the legend.py file accordingly. Note that in addition to setting a different prefix, an alias was created for each icon.
When using the Legend widget, the process of adding layers changes slightly. Whereas previously we used our own method to load and display a layer, where we added a layer and updated LayerSet, the Legend widget now controls the process of loading and deleting layers. The widget has a slot that updates the layer list whenever a layer is added, removed, or moved. All we have to do is call the appropriate methods of the QgsMapLayerRegistry class (e.g. addMapLayer() or removeMapLayer()). But calling the setLayerSet() method of the QgsMapCanvas class is no longer needed because the legend widget takes care of it. It can be commented out or removed altogether. So only one line of code is needed to add a new layer
QgsMapLayerRegistry.instance().addMapLayer(layer)
Here layer is an instance of the QgsVectorLayer or QgsRasterLayer class, you can read more about this in the aforementioned Coding and Compiling Guide.
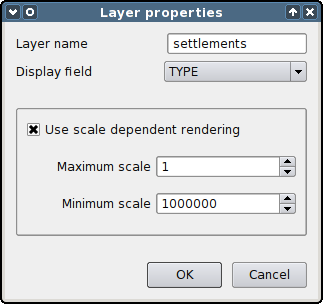
A simple layer properties dialogue is provided with the layer list widget. To use it, you need to compile the dlgLayerProperties.ui file
pyuic4 dlgLayerProperties.ui -o dlgLayerProperties_ui.py
This dialogue allows you to set the layer name, change the display field, and set scale-dependent visibility. If this functionality is not enough, you can use this dialogue as a starting point and develop your own version.
When the active layer is changed, the Legend widget emits an activeLayerChanged signal. This signal can be used to enable/disable certain tools of the application, e.g. depending on the layer type (raster or vector). To do this, you need to connect the signal to a slot in the main application class, that is responsible for enabling/disabling tools or performing some other action. For example
self.connect(self.legend, SIGNAL("activeLayerChanged"), self.enableTools)

def enableTools(self):
    if not self.legend.activeLayer():
        # there is no active layer, disabled generic map tools
    else:
        # make generic map tools enabled
        …
        layerType = self.legend.activeLayer().layer().type()
        if layerType == 0: # Vector Layer
            # activate vector layer tools and deactivate all others
        elif layerType == 1: # Raster Layer
            # activate raster layer tools and deactivate all others
The widget also provides several useful methods for you to:
- loop over all map layers
for layer in self.legend.layers: # do something with the layer - show or hide all layers
def showAllLayers(self): self.legend.setStatusForAllLayers(True) - get active (selected in the layer list) layer
return self.legend.activeLayer() - refresh layer symbology
self.legend.refreshLayerSymbology(layer) - remove layers with the given ids
self.legend.removeLayers(layerIds)
Of course, this is by no means a complete list of the widget’s methods. You can get a complete overview of its capabilities by looking at the legend.py file, the code is clean and well documented, so it won’t be difficult to understand.
That’s all I wanted to show you about this widget. A lot of things have been left out: for example, we haven’t covered setting up the symbology, improving the layer properties dialogue, the interaction between the legend and map tools… Maybe I’ll write another post if there’s enough interest.
The source code of the example application, as well as all necessary icons and a test dataset can be downloaded here.
I also want to mention that there is another layer list widget created by Aaron Racicot for the OpenOceanMap project. It is based on the QCheckBox control instead of the QTreeWidget.